Set up of a Wordpress site + database with MAMP and phpmyAdmin on localhost step by step [tutorial]
This tutorial will guide you through the process of setting up a Wordpress site using MAMP.
MAMP stands for Macintosh, Apache, MySQL, and PHP. MAMP is an application you can install on your Mac which allows you to have access to a local PHP server and MySQL server. Essentially, MAMP gives you all of the tools you need to run WordPress on your machine, for development and testing purposes
The basic version is free to use and it is enough to set up a fully functional local site for Wordpress. you can download it from:
Download a fresh version of Wordpress.
Always start with a new version of Wordpress. You can get the latest version from WordPress Official Website
Once downloaded the .zip file, export it to your preferred location, usually the project folder. I am using the desktop for this Tutorial.
Link Wordpress folder to MAMP

The home screen for MAMP will look like the above picture. We have to edit the preferences to connect our Wordpress folder. Click on Preferences... a new pop up window will open up like below:

Click on the Web Server tab on the top right and click on the folder icon with the 3 dots to select the path to your folder.
Make sure you select the highest level of the downloaded Wordpress file. Its original name is Wordpress but you can rename this to whatever you like without affecting any action.
Press ok and go back to MAMP home screen.
Click Start Servers. Give it a moment to load, and then your MAMP screen should look like the below:

Accessing your local MAMP homepage
Once the server starts your browsers should immediately and automatically launch MAMP localhost homepage.
If it doesn't you can access it via this web address: http://localhost:8888/MAMP/?language=English
Access phpMyadmin from the homepage
On the homepage you will find the link to access phpMyadmin, the area where we will go to create the Database for our project.
Click on phpMyadmin under the section MySQL:

phpMyAdmin is a free and open source tool written in PHP intended to handle the administration of MySQL or MariaDB with the use of a web browser. It can perform various tasks such as creating, modifying or deleting databases, tables, fields or rows; executing SQL statements; or managing users and permissions. More about phpMyadmin here: https://en.wikipedia.org/wiki/PhpMyAdmin
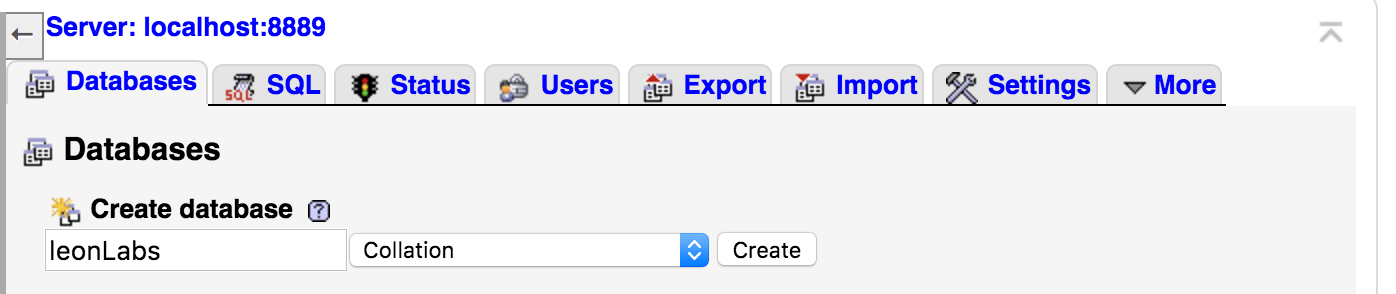
Create a database in phpMyadmin
From your phpMyAdmin homepage click on the Databases tab in the centre-right area of the page.

And add a name for the Database. I have called it leonLabs. Click Create.
Create a user in phpMyadmin
We now need to create a user in order to access this database.
Go back to the phpMyAdmin homepage and click on the Users tab in the centre-right area of the page. (3 positions along from Databases that we clicked before).
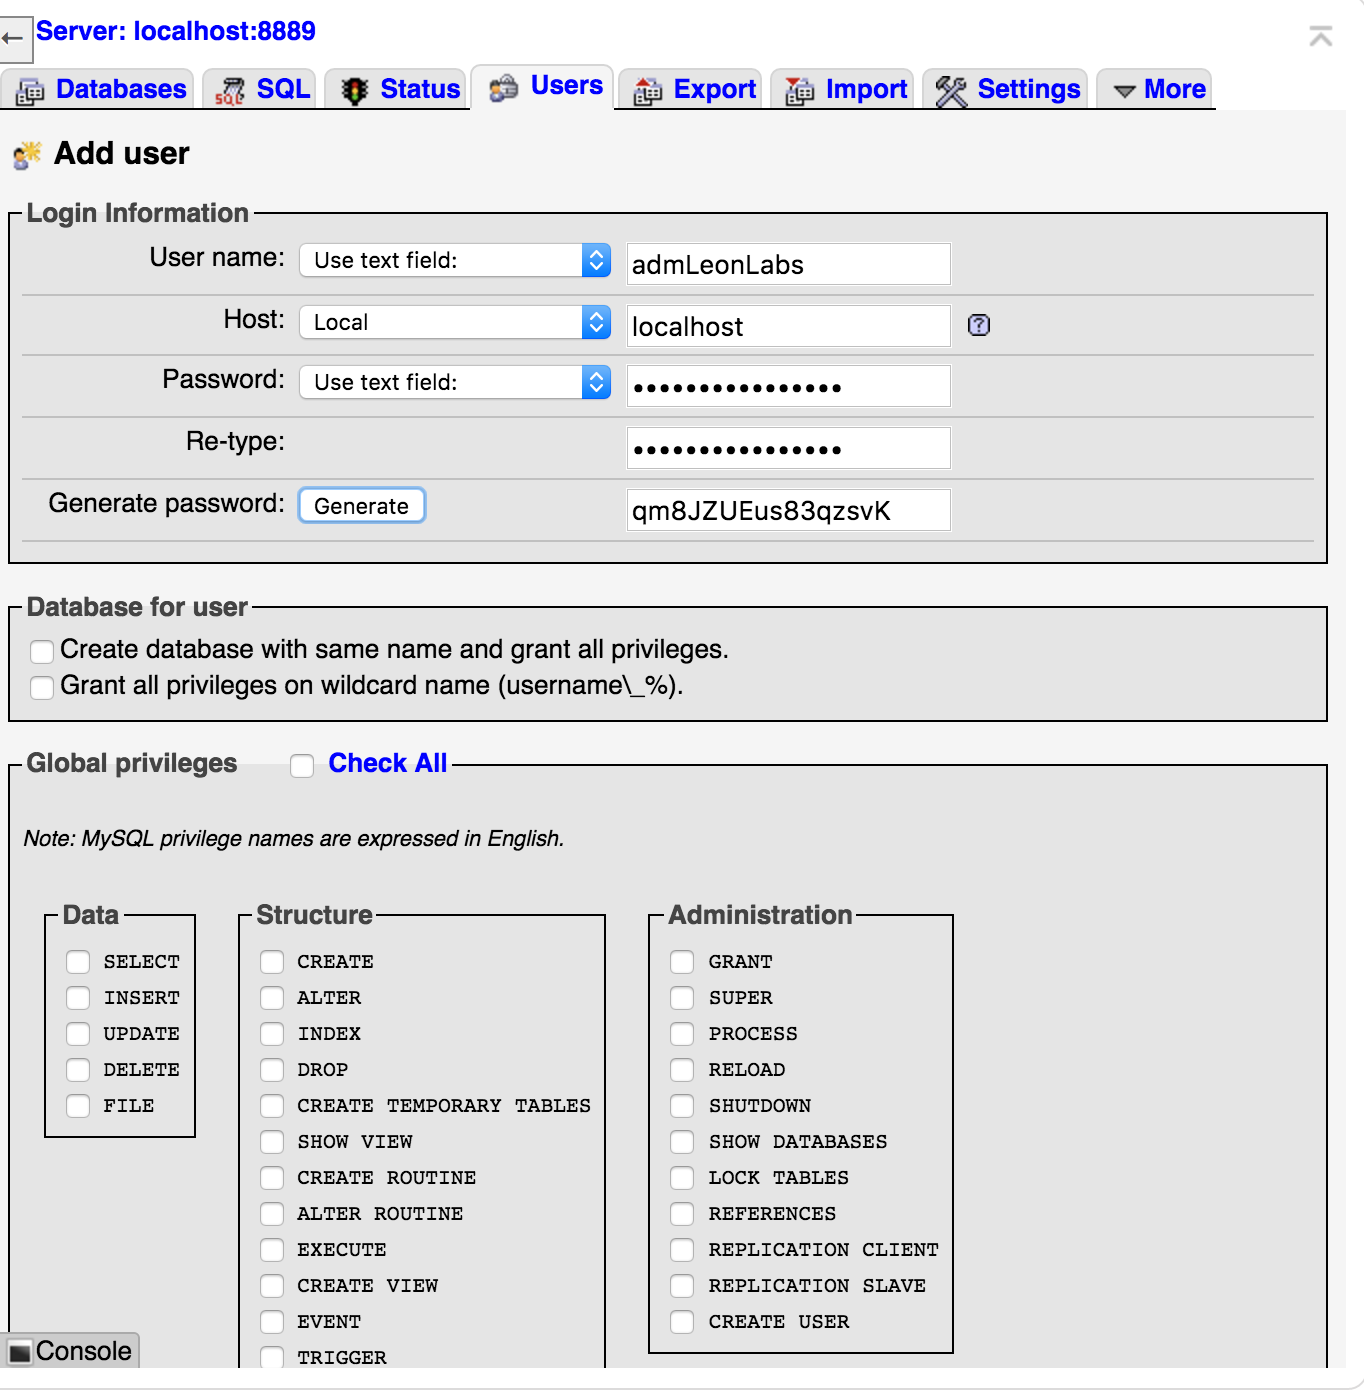
Following the image above as a guide lets create the new user.
I have called my user admLeonLabs and set the Host as localhost.
You must also add a password. It is best to use a very secure password when creating databases and users so i have auto generated one by clicking on the button.
Make a note of these details as we will need them later on.
Make sure now that the boxes Grant all privileges on wildcard name (username\_%). and Check All are checked like below:

These steps are essential in order to don't generate any error later on from Wordpress.
Scroll now to the end of the page and click Go.
This is all you have to do from phpMyAdmin. You can now close the page and we can move onto initialising Wordpress.
Localhost and Wordpress
After setting up the database and the user we can now start working on the Wordpress set up.
Make sure you have followed all the steps above: you have linked worpress folder to MAMP and have created a database and a user.
Go to your localhost page.
It should automatically direct you to http://localhost:8888/wp-admin/setup-config.php
This should be what it looks like:

Select the language you prefer. I use English UK but feel free to use anything that suites you, then press Continue button.
It will direct you to a page with a checklist where you can make sure you have all the informations you need. If you have followed correctly this tutorial so far you have all the informations, so go on and click the Let's go button.
Filling in the database information
This screen asks you to let Wordpress know about the database specs. You already have all these informations. They are the ones we have set up in phpMyAdmin previously. Hopefully you have taken a note about them. If not go back to phpMyAdmin homepage and find them.
Insert the database name, the username, and the password. Everything else should stay the same. The Host is set as localhost and the table prefix will be wp_
This page will look like below:

Press Submit.
When the next screen appears, click Run the install. If you have any error, scroll to the last point of this tutorial to find a possible solution!

Filling in the site informations
This is where we insert all the informations about our site.
Chose a name for the site title. I have used Leon Labs.
Then add in your username. This will be the name you use to login and to post on the site. It can be different from the one used for the database. I have used my name. Pick also a safe password.
Once you have insert all your infos like in the image below, click Install Wordpress

And if something goes wrong?
If for any reason you had some error, then go to your Wordpress folder and open the wp_config.php file. You can reset all the database info from this file. Save and go back to localhost.

